Creating an HTML Popup Modal Using HTML, CSS, and JS
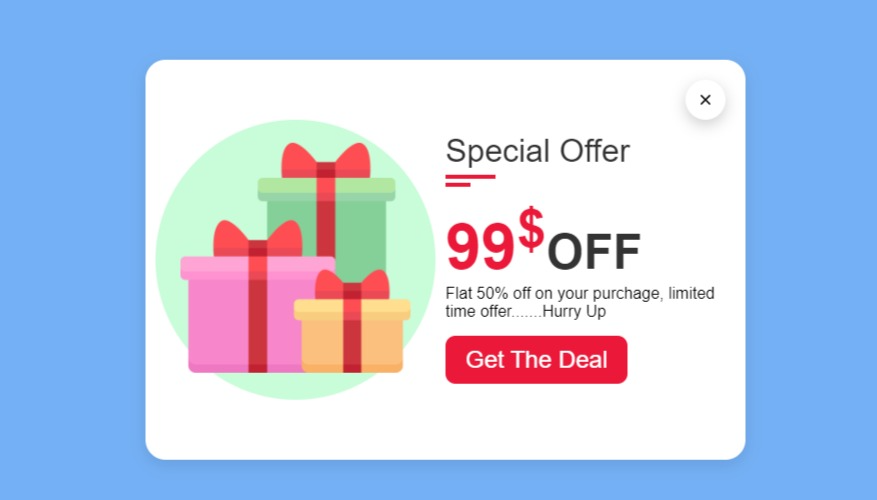
HTML Popup Modal windows are a great way to grab the attention of your user and convey important information. One common use of popups modal is to offer visitors special deals or promotions for your users. In this tutorial, we’ll walk through how to create an attractive offer popup modal using HTML, CSS, and JavaScript.
Step 1: Create the HTML Markup for the HTML Popup Modal
First, let’s create the basic HTML markup for our popup window. Within one second, the popup modal will be triggered, and then create a div element that will serve as the popup window:
HTML Code
<!DOCTYPE html>
<html lang="en">
<head>
    <meta charset="UTF-8">
    <meta http-equiv="X-UA-Compatible" content="IE=edge">
    <meta name="viewport" content="width=device-width, initial-scale=1.0">
    <title>Responsite Offer Popup With HTML, CSS & JS </title>
    <link rel="stylesheet" type="text/css" href="style.css">

</head>
<body>
    <div class="popup">
        <div class="contentBox">
            <div class="close">

            </div>
            <div class="imgBx">
               <a href="https://www.flaticon.com/free-icons/discount" title="discount icons"> <img src="gift.png"></a>
            </div>
            <div class="content">
                <div>
                    <h1>Special Offer</h1>
                    <span class="ul1"></span>
                    <span class="ul2"></span>
                <h2>99<sup>$</sup><span>Off</span></h2>
                <p>Flat 50% off on your purchage, limited time offer.......Hurry Up</p>
                <a href="#">Get The Deal</a>
                </div>
            </div>

        </div>
    </div>


</body>
</html>
The popup window itself is contained within a div element with a class of “popup”. We’ve added a heading, some text, a form for visitors to enter their email address, an image, and a “Close” icon on the top right.
Step 2: Style the Popup with CSS For HTML Popup Modal
Now that we have our HTML markup in place, let’s add some CSS to style the popup window. We’ll start by setting the initial display of the popup to “none” so it’s hidden when the page loads:
CSS Code
:root{
    --skin-color:#ec1839;

}
*
{
    font-family: sans-serif;
    box-sizing: border-box;
    margin: 0;
    padding: 0;
}
body
{
    min-height: 100vh;
    background: #74b0f5;
}
.popup
{
    position: fixed;
    left: 50%;
    top: 50%;
    transform: translate(-50%,-50%);
    display: none;

}
.contentBox
{
    position: relative;
    display: flex;
    background: #fff;
    width: 600px;
    border-radius: 20px;
    height: 400px;
    box-shadow: 0 5px 15px rgba(0,0,0,0.1);
}
.contentBox .imgBx
{
    position: relative;
    display: flex;
    justify-content: center;
    align-items: center;
    width: 300px;
    height: 400px;
    pointer-events: none;
}
.contentBox .imgBx::before
{
    content: '';
    position: absolute;
    height: 280px;
    width: 280px;
    background: #b1fac7af;
    border-radius: 50%;

}
.contentBox .imgBx img
{
    position: relative;
    max-width: 230px;
    z-index: 1;
    pointer-events: none;

}
.contentBox .content
{
    position: relative;
    display: flex;
    justify-content: center;
    align-items: center;
    width: 300px;
    height: 400px;
}
.contentBox .content  h1
{
    color: #333;
    line-height: 1em;
    font-weight: 300;
    font-size: 2em;
    /* margin-top: -50px; */
    margin-bottom: 30px;
    position: relative;
}
h1::before{

    content: '';
    height: 4px;
    width: 50px;
    background-color: var(--skin-color);
    position: absolute;
    top: 100%;
    left: 0;
    margin-top: 8px;
}
h1::after{
    content: '';
    height: 4px;
    width: 25px;
    background-color: var(--skin-color);
    position: absolute;
    top: 100%;
    left: 0;
    margin-top: 16px;
}
.contentBox .content  h2
{
    font-size: 4em;
    color: var(--skin-color);
    line-height: 1em;
}
.contentBox .content  h2 span
{
    color: #333;
    font-size: 0.75em;
    text-transform: uppercase;
}
.contentBox .content p
{
    font-weight: 300;

}
.contentBox .content a
{
    display: inline-block;
    padding: 10px 20px;
    background: var(--skin-color);
    text-decoration: none;
    font-size: 1.5em;
    font-weight: 500;
    color: #fff;
    margin-top: 15px;
    border-radius: 10px;

}
.contentBox .content a:hover{
    box-shadow: 0 5px 15px rgba(0,0,0,0.5);
    transition: 0.2s;


}
.close
{
    position: absolute;
    top: 20px;
    right: 20px;
    right: 20px;
    width: 40px;
    height: 40px;
    background: #fff url(close.png);
    background-repeat: no-repeat;
    background-size: 10px;
    background-position: center;
    cursor: pointer;
    border-radius: 50%;
    z-index: 10;
    box-shadow: 0 5px 15px rgba(0,0,0,0.2);

}

@media(max-width : 660px)
{
    .contentBox
    {
        margin-top: 70px;
        width: 300px;
        height: auto;
        flex-direction: column;
    }
    .contentBox .imgBx{
        height: 200px;
        transform: translate(0px );
        margin-top: -50px;

    }
    .contentBox .imgBx::before
    {
        background: #fff;
    }
    .contentBox .content
    {
        height: auto;
        text-align: center;
        padding: 20px;
        margin-top: 50px;
        padding-top: 0;

    }
    .close{
        top: -50px;
        right: -10px;
        background: #fff url(close.png);
        background-repeat: no-repeat;
        background-size: 10px;
        background-position: center;

    }

}


/**** image credit https://www.flaticon.com/ */
In the above CSS, we’ve used a combination of position, top, left, and transform properties to center the popup window on the page. We’ve also given it a width, a maximum width, a sky-blue background color, some padding, a border radius, and a box shadow to make it look like a proper popup window.
Step 3: Add JavaScript to Show and Hide the Popup For HTML Popup Modal
Finally, we’ll add some JavaScript to make the popup window appear when the visitor clicks the button, and to make it disappear when they click the “Close” icon.
<script>
        const popup = document.querySelector('.popup');
        const close = document.querySelector('.close');

        window.onload = function(){
            setTimeout(function(){
                popup.style.display = "block"
            },1000)
        }
        close.addEventListener('click', () => {
            popup.style.display = "none"
        })
    </script>
Final Output Of HTML Popup Modal


Pingback: Magic Navigation Menu Indicator Using Html CSS & Javascript | Curve Outside Effects - TechyTechs